What is the Correct Ergonomic Height for my Office Chair, Desk and Computer Monitor?
- Updated:
About the author:

Mike Karle

“Create Healthy Workspaces”
Time and again we get asked the same question….“what is the correct ergonomic height setting for my office chair?” The answer is not that simple because it depends on two main factors, namely your height, and the type of work that you do. Because every person and their job environment is unique, the correct height for your desk, monitor and office chair will fall within a range of values. Why a fully adjustable office chair is important.
Summary
The correct office chair height is when your feet are flat on the floor, your knees are slightly below the level of your hips, and your elbows are bent at approximately 90° and can rest comfortably on the arm pads. Once your chair has been correctly adjusted, raise or lower your desk so that the desk surface is level with the top of the armrests.
How to correctly adjust the height of your
- Office Chair
- Desk
- Monitor
Watch the video or continue reading for a comprehensive description.
The correct ergonomic chair, desk and monitor height for office work
If you use a desk chair doing ‘normal’ or ‘standard’ office work like writing or working on a computer, then the following guidelines are applicable for setting the correct ergonomic height for your office chair, desk and monitor.

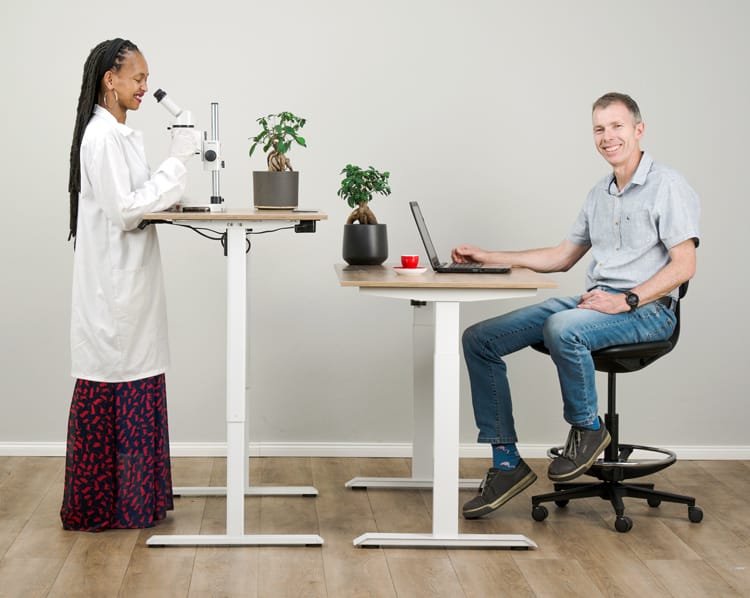
Whether you are standing or sitting, adjust the desk, office chair and monitor so that it is at a comfortable ergonomic height. Best practices for ergonomics in the workplace. Find out whether it is good to alternate between sitting and standing at work.
What is the correct height for your OFFICE CHAIR, DESK and MONITOR?
Every person is unique and the height ranges shown in the tables below should serve as a guide or starting point.
| Your height with shoes (cm) | Desk height -seated (cm) | Chair seat height (cm) | Monitor height – seated (cm) | Desk height – standing (cm) | Monitor height – standing (cm) |
|---|---|---|---|---|---|
| 152 | 55-60 | 36-41 | 105-109 | 92-98 | 141-145 |
| 155 | 57-62 | 36-42 | 107-112 | 93-100 | 144-148 |
| 158 | 58-63 | 37-42 | 110-113 | 95-103 | 147-150 |
| 161 | 60-65 | 38-44 | 112-115 | 97-105 | 150-153 |
| 164 | 61-66 | 39-44 | 114-118 | 99-106 | 153-156 |
| 167 | 62-68 | 40-45 | 116-120 | 100-108 | 155-159 |
| 170 | 64-70 | 41-45 | 118-122 | 102-110 | 158-162 |
| 173 | 65-72 | 42-46 | 120-124 | 104-112 | 161-164 |
| 176 | 66-73 | 43-48 | 122-126 | 106-114 | 164-168 |
| 179 | 68-75 | 44-48 | 125-129 | 107-116 | 167-170 |
| 182 | 69-76 | 45-49 | 127-131 | 109-118 | 170-173 |
| 185 | 71-78 | 46-50 | 129-134 | 111-120 | 172-175 |
| 188 | 72-80 | 47-51 | 131-135 | 113-122 | 175-179 |
| 191 | 74-82 | 48-52 | 133-138 | 115-124 | 178-181 |
| 194 | 75-83 | 49-53 | 135-140 | 116-126 | 181-184 |
| 197 | 77-85 | 50-53 | 138-142 | 118-128 | 184-187 |
| 200 | 78-86 | 51-54 | 140-145 | 120-130 | 187-190 |
1. Sitting at a Desk
Select your height in centimeters (cm), to determine the correct height for your DESK, CHAIR and MONITOR.
| YOUR HEIGHT WITH SHOES (CM) | DESK HEIGHT -SEATED (CM) | CHAIR SEAT HEIGHT (CM) | MONITOR HEIGHT – SEATED (CM) |
|---|---|---|---|
152 |
55-60 |
36-41 |
105-109 |
155 |
57-62 |
36-42 |
107-112 |
158 |
58-63 |
37-42 |
110-113 |
161 |
60-65 |
38-44 |
112-115 |
164 |
61-66 |
39-44 |
114-118 |
167 |
62-68 |
40-45 |
116-120 |
170 |
64-70 |
41-45 |
118-122 |
173 |
65-72 |
42-46 |
120-124 |
176 |
66-73 |
43-48 |
122-126 |
179 |
68-75 |
44-48 |
125-129 |
182 |
69-76 |
45-49 |
127-131 |
185 |
71-78 |
46-50 |
129-134 |
188 |
72-80 |
47-51 |
131-135 |
191 |
74-82 |
48-52 |
133-138 |
194 |
75-83 |
49-53 |
135-140 |
197 |
77-85 |
50-53 |
138-142 |
200 |
78-86 |
51-54 |
140-145 |
2. Standing at a Desk
Select your height with shoes in centimeters (cm), to determine the correct height for your DESK and MONITOR.
| YOUR HEIGHT WITH SHOES (CM) | DESK HEIGHT -STANDING (CM) | MONITOR HEIGHT – STANDING (CM) |
|---|---|---|
152 |
92-98 |
141-145 |
155 |
93-100 |
144-148 |
158 |
95-103 |
147-150 |
161 |
97-105 |
150-153 |
164 |
99-106 |
153-156 |
167 |
100-108 |
155-159 |
170 |
102-110 |
158-162 |
173 |
104-112 |
161-164 |
176 |
106-114 |
164-168 |
179 |
107-116 |
167-170 |
182 |
109-118 |
170-173 |
185 |
111-120 |
172-175 |
188 |
113-122 |
175-179 |
191 |
115-124 |
178-181 |
194 |
116-126 |
181-184 |
197 |
118-128 |
184-187 |
200 |
120-130 |
187-190 |
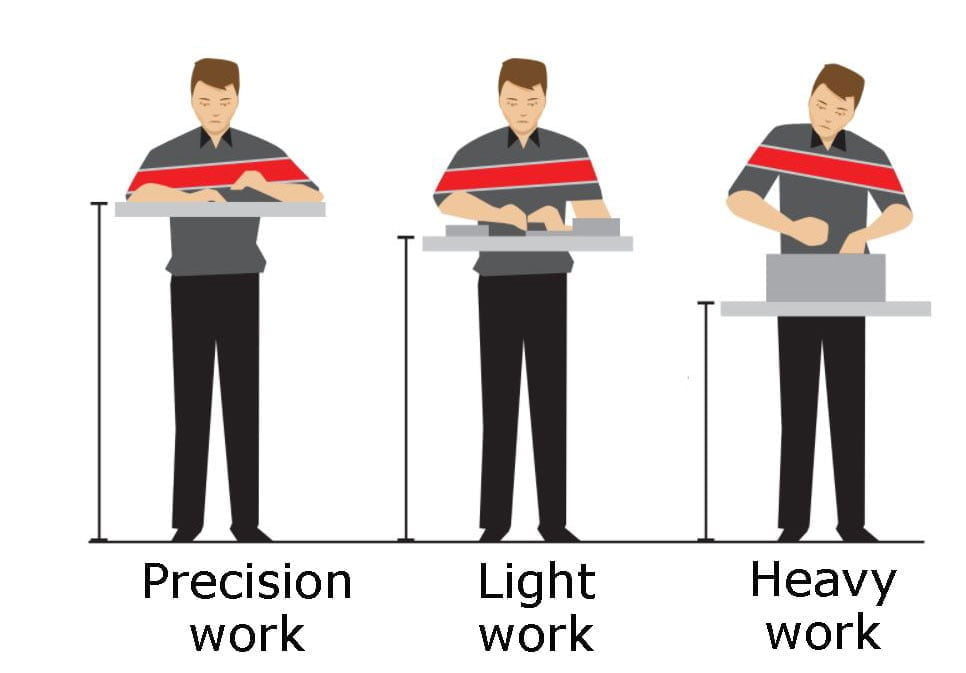
Work surface height settings for other (non-office) work
If you do non-office work at a desk or workstation, then the above height ranges may not apply.
For example, precision assembly or laboratory work typically requires a higher work surface, and heavy assembly a lower one. Industrial, Laboratory & Medical Chairs cater for this type of work.
Contact our Ergonomic Risk Facilitators who will gladly assist you in setting the correct height for your office chair, desk and monitor.
Confused about which chair is best for you?
How to correctly adjust the height of your OFFICE CHAIR, DESK and MONITOR
THE CHAIR
- Move the chair away from the desk.
- Sit back in the chair with your back positioned properly against the chair backrest.
- Check that the gap between the inside of your knees and the front edge of the seat. It should be about 3 fingers wide. If it is more than 3 fingers wide, increase the depth of the seat by adjusting the seat slider forward to extend the seat depth. If it is less than 3 fingers wide, adjust the seat slider backwards to shorten or reduce the depth of the seat.
- Now adjust the height of the chair. The correct chair height is when both your feet (with shoes), are flat on the floor and your knees are slightly lower than the level of your hips. By sitting with your knees below the level of your hips you reduce the rotation of the pelvis which in turn reduces the pressure in the lumbar discs. What happens when you sit?
- Adjust the height of the armrests so that when your forearms rest on the arm pads, your elbows are bent at approximately 900. Your shoulders should be relaxed and comfortable – in other words you should not have to lift your shoulders (armrests too high) or let them drop downwards (armrest too low).
- Adjust the width of the armrests to suit your body shape. Ideally the arm pads should be positioned so that your upper arm is vertical and not extended too far outwards away from your body.
- Rotate the arm pads so that your forearms rest comfortably over the full extent of the arm pad.
- Adjust the tension of the swivel mechanism so that it suits your body weight. When you relax in the chair, you should easily be able to recline backwards without using excessive force. As you recline, the spring tension should “balance” your weight.
- Adjust the height of the backrest and/or the position of the lumbar support so that it fits snugly in the lumbar region of your back. Ensure that you keep the spine in a natural position. Don’t over or under accentuate the inward curvature of your spine. Back support for office chairs.
- Adjust the headrest into a comfortable position. Tip: Placing your head back and touching the headrest forces you to push your shoulders into the backrest and lift up your chest. This lifts your diaphragm which enables you to breathe better. Improved breathing leads to better concentration.
Now (and only now), move the chair towards the desk.
THE DESK
- The top of the armrests should be in line with the surface of the desk. In other words, just like your forearms were resting comfortably on the arm pads, they should now rest comfortably on the desk with your elbows bent at about 900.
- If your elbows are bent at an angle much greater than 900, the desk is too low. Raise the height of the desk.
Do not lower the chair height because you will then sit with your knees above the level of your hips which will increase the pressure in the lumbar discs and quickly result in back pain. Furthermore, you will automatically hunch your back resulting in shoulder and neck pain. This is critical. If the desk is not height adjustable, use blocks of wood, old books, reams of paper etc, to raise the height of the desk. - If your elbows are bent at an angle much less than 900, the desk is too high. Lower the height of the desk. If the desk is not height adjustable, then raise the height of the chair. This means that your feet will no longer be flat on the floor, so use a Footrest to support your feet. Do not let your feet dangle in the air.
- If you need to sit closer to the desk and only use the desk to support your forearms, lower the armrests so that they are under the desk when you work. Alternatively slide the arm pads backwards to allow you to sit closer to the desk.
THE MONITOR
- Adjust the height and distance of your monitor so that the top of the screen is at eye level and about an arms-length away.
- If you use 2 monitors, position them equally from you. Ergonomics in the workplace.
RELAXING IN THE CHAIR
Release the synchronous or free-float mechanism and tilt fully backwards in the chair to increase the angle between your thighs and torso. By changing this angle, you automatically stimulate, or activate numerous muscles in your lower back, core and legs. As a result, the blood flow through these muscles increases, bringing oxygen and other nutrients to the muscles and carrying away the waste products of muscle metabolism. By doing so, muscle fatigue and its associated pain is reduced, particularly in the lower back. This is known as Dynamic Sitting.
FAQ's
1. What is the correct office chair height?
You should be properly seated on the chair with your feet flat on the floor and your knees slightly below the level of your hips.
2. Should you adjust your chair at your desk?
No. You should always adjust the chair away from your desk. Once the chair has been correctly adjusted, move the chair towards the desk.
3. Should your knees be higher than the level of your hips?
No. Your knees should always be below the level of your hips. If your knees are higher than your hips, the pressure in the lumbar discs increases resulting in lower back pain.
4. What height should the armrests be?
Adjust the height of the armrests so that when your forearms rest on the arm pads, your elbows are bent at approximately 900. Your shoulders should be relaxed and comfortable – in other words you should not have to lift your shoulders (armrests too high) or let them drop downwards (armrest too low). The top of the armrests should be in line with the surface of the desk.
5. What if my desk is not adjustable?
If you don't have a height adjustable standing desk, use blocks of wood, old books, or reams of paper to raise the height of the desk. Do not lower the height of the chair to match the desk.
6. What if my feet do not reach the floor?
If your feet don't touch the floor, use a footrest to support your feet. Do not let your legs dangle in the air.
By the same author:

Why Every Production Line Needs the Right Industrial Chair
Invest in the right industrial chair to boost productivity, reduce injuries, and support factory workers on your production line.

Why Automated Fabric Cutting improves quality
High quality office and casino seating requires advanced automation, like automated fabric cutting.

Why an ergonomic chair has even more relevance in a 4-day work week
A 4-day work week can result in people sitting continuously for long hours, making an ergonomic chair a “no brainer”.